How to Recover Sanity Lost or Broken Project
Updated at: 20 March 2025Deepak Painkra
In this article, I will show you how to recover a lost or broken sanity project. Even the project got lost because of storage corruption.
Sanity CLI Installation Processes
If you haven't installed sanity CLI on your system, install it by issuing this command.
After the installation process, open the VSCODE or whatever editor you’re using, and the process will be the same, so let me show you. Create a new sanity project by issuing this command,
After some time, it will ask you to sign in with GitHub and Gmail. Now, choose the account, which was associated with your previous sanity project. In my case, I connected my Gmail account with my sanity project. Let me sign in with my Gmail account.
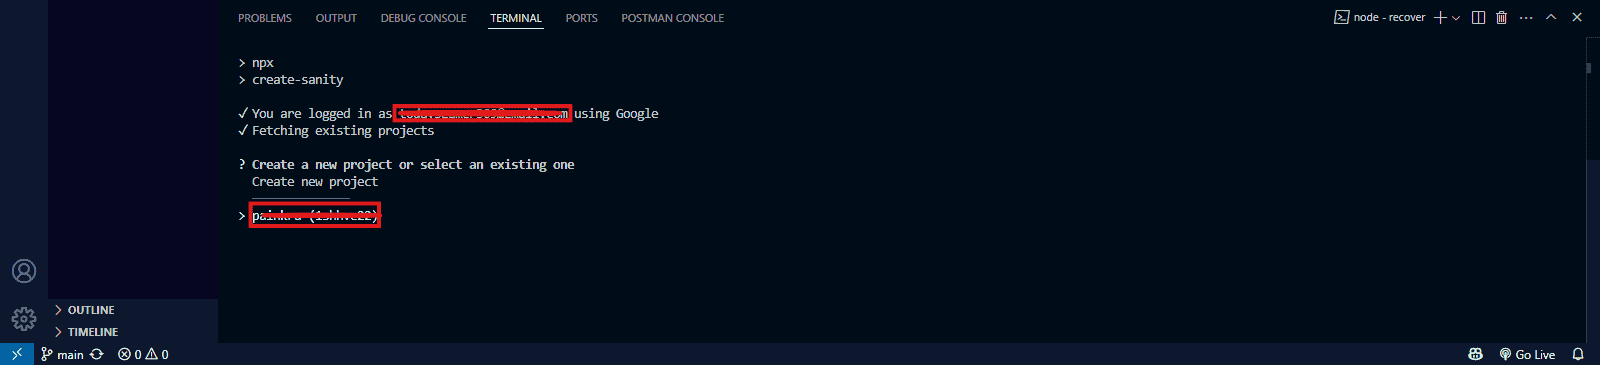
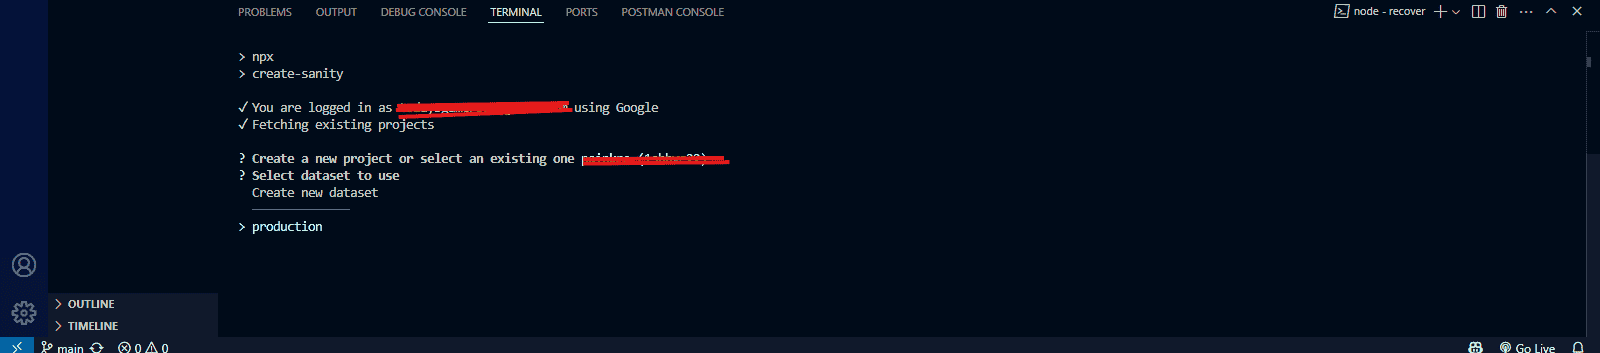
After this session, it will ask you to choose a dataset. Which you would like to use for this project? Since we are recovering our previous project. I will use the previous datasets. In case you forget your project dataset ID.
Go to the official website of Sanity CMS. Sign in with the link account, which was associated with your previous sanity project, and after signing, you will see your project dataset ID. Choose the project which you want to recover.
Now, it will ask you to choose the environment, choose production, and then press enter.
After that, it will ask you to choose a schema which in my case was a blog so let's choose the blog option.

So, choose your dataset and press enter. It will now create your previous project, but there is a catch, and let me tell you.
Creating a Schema for Sanity Project
Create a schema similar to what was associated with your pre-existing project. Don’t try to change the schema structure because you will lose your dataset if you have a blog post.
Now, again go to the official website of the Sanity CMS open your hosted Sanity studio, and write your schema like the previous one. In my case, this is what my schema looks like.
import { defineField, defineType } from 'sanity'

export default defineType({
  name: 'techblog',
  title: 'TechBlog',
  type: 'document',
  fields: [
    defineField({
      name: 'lastModified',
      title: 'Last Modified',
      type: 'datetime',
    }),
    defineField({
      name: 'title',
      title: 'Title',
      type: 'string',
    }),
    defineField({
      name: 'metadesc',
      title: 'Meta Description',
      type: 'string',
    }),
    defineField({
      name: 'slug',
      title: 'Slug',
      type: 'slug',
      options: {
        source: 'title',
        maxLength: 96,
      },
    }),
    defineField({
      name: 'author',
      title: 'Author',
      type: 'reference',
      to: { type: 'author' },
    }),
    defineField({
      name: 'mainImage',
      title: 'Main image',
      type: 'image',
      options: {
        hotspot: true,
      },
    }),
    defineField({
      name: 'categories',
      title: 'Categories',
      type: 'array',
      of: [{ type: 'reference', to: { type: 'category' } }],
    }),
    defineField({
      name: 'publishedAt',
      title: 'Published at',
      type: 'datetime',
    }),
    defineField({
      name: 'body',
      title: 'Body',
      type: 'blockContent',
    }),
  ],

  preview: {
    select: {
      title: 'title',
      author: 'author.name',
      media: 'mainImage',
    },
    prepare(selection) {
      const { author } = selection
      return { ...selection, subtitle: author && `by ${author}` }
    },
  },
})
Mention your schema to a index.js page, so that it will be visible in Sanity Studio.
import blockContent from './blockContent'
import category from './category'
import techblog from './techblog'
import author from './author'

export const schemaTypes = [techblog, author, category, blockContent]
After creating a schema. Now, issue this command,
It will build your project. And let's run this command to check whether your local sanity studio is running.
Make sure to delete the post.js and run this command,
There we go. You have recovered your sanity project.